
EGO Z6 12 volt accessory power outlet mod
Hi all, this will be a relatively short write up just to document my EGO Z6 mower mod to add a 12 volt dc (vdc) accessory outlet to the mower, to power things like a yard sprayer, maybe an LED light bar or work light for an outdoor event, my home made 12v cooler, really anything up to 25 amps @ 12vdc! The reason you can not do this today without modifying your mower is that the battery system is 56 volt dc, and there are no high current 12v outputs anywhere from the factory. Hence my hackery.... Just a heads up I have years of electronics experience, trial and error testing, and I get to play with electricity as my day to day career.

Lets go! First I had to find a suitable DC to DC converter. Surprisingly there are not as many available as I thought there would be, most of them are for kids electric scooters. But I finally found one on Amazon that covered a wide input voltage and had enough amperage output to be useful, was somewhat water proof, had a large heat sink, and it didn't break the bank, 25 bucks. All of my check boxes were checked on this one!

Now I started to tear apart my expensive EGO tool.... eek..
Getting the seat off, as well as the seat slider assembly was probably the hardest part of this job, still not a huge deal.
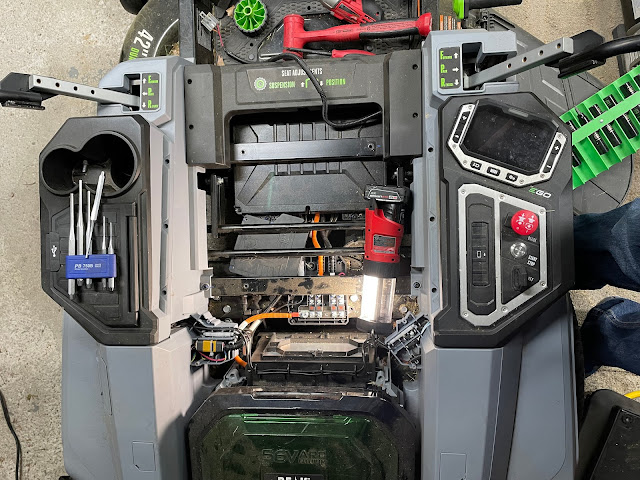
Here is a picture where the seat and slider assembly are gone, and I pulled the top off the main 56 volt distribution block.

Here is a closeup of the main bus and fuses for the left and right wheel drives and the blade drives. I was a bit shocked ego choose 80 amp fuses here, especially considering the dc wire leaving these fuses looked like it might be 12ga. But you will notice EGO left me an open fuse spot between the four 80 amp fuses, where I can install my own 30 amp MIDI fuse right on the 56 volt bus.

Oh the other cool thing about this 56 volt bus is that it is switched by the battery module with the main mower power switch.. So when you shut the mower off and after the mowers internal timeout, it will shut off power to the DC-DC converter too, and likewise when you turn it on, it will then power up the DC-DC converter at the same time.
There happened to be a huge gap between the seat assembly and the side wall of the Z6, so it worked out mounting the DC-DC converter here, it would have plenty of air for cooling, nothing behind that screws/bolts for the inverter would hit, no worries about something hitting or rubbing up against the converter, easy to get to and replace without having to tear the seat out again if needed.

A few things just to point out for the fellow geeks out there, EGO's design for making this stuff waterproof, or rather water resistant, is that all of the electrical connections will be greased with dielectric grease to keep water out of the physical connections, then they mount the connections off the bottom of the various enclosures, they kind of levitate the connections, so if water gets in there, the water drips down to the bottom of the enclosure, and all of the enclosures have drain holes in the bottom of them to drain the water away. So rather than engineering this like a car, with 100% waterproof connectors, they expect them to get wet and drain away the water so the connectors don't just sit in a puddle of water, degrading the connection.

These drain holes are even in the main 56 volt distribution housing.

Anyway here is the 56 volt distribution block with my added 30 amp fuse for the DC input to the DC-DC converter.

So the wiring to the DC-DC converter goes something like this:

So the RED + is ran to the new 30 amp MIDI fuse I added, this is the 56 VDC input to the DC-DC converter. Then the BLACK + goes to the negative terminal within the same 56 vdc distribution housing. Those two wires come from the the 56 vdc distribution housing over to the inverter where I installed the companion connector to the DC-DC converter. There is a second positive and negative lead for the 12vdc accessory outlet installed in the back of the mower, those leads come to this same companion connector on the DC-DC converter. BLACK negatives all go to the same pin on the converter, then the +12vdc output wire (YELLOW) goes to the accessory plug output. This DC-DC converter has an accessory wire (GREEN) you can tie this to a switch, or just do like I did and tie it to the RED wire so that the DC-DC converter powers up whenever there is 56 volts available, I let the EGO battery module control the power.
Once all wired up and I did my initial test, I used a similar dielectric grease on my connections to help water prof them. I prefer this particular dielectric grease (Dow Corning #4), you can get it from Amazon as well. I prefer this grease because it meets some military specs for connectors in really harsh locations, also works great on O-Rings, EV charging connectors etc...


Here is a test video of the DC-DC converter in action! This video also shows the PowerCon connectors I like to use on my various projects, for more info on the connectors see my other post about the 12vdc cooler build here!
Side note, for this project I also upgraded the hitch on the Z6, though the factory hitch is pretty sturdy, it was a little bouncy with my heavy leaf vacuum hooked up, so I bought this other one from Tractor Supply, this third party hitch bolts right up to the same holes, you just need to buy some new longer bolts and lock-nuts as well as the two outside bolts. It gives it a little more meat to the main Z6 frame from the hitch, and this one doesn't bounce like the OEM hitch.


Comments
Thanks for sharing all this info!