For this project I wanted to convert a commercial dual port ChargePoint EV charger into something I had full control over. With ChargePoint pushing its clients to upgrade to the CT4000 (the large LCD screen model) lots of people are tearing out the CT2000 series chargers and either scrapping them or selling them. I found mine on Facebook Market place for a couple hundred bucks. These chargers are built really well, with extruded aluminum cases, aluminum component modules that slide out for easy replacement, they are just really nicely built chargers made to take abuse from people and weather.
I use the word "Charger" a lot in this post, I'm well aware that the actual battery charger for the vehicle is actually mounted internal to the vehicle.. Each EV has its own on-board charger that can accept various AC voltages, convert to DC and charge your car battery. The external "charging stations" really just provide AC to those existing chargers, they are not the actual "Charger". That said we all associate them as chargers which is why I call them chargers, or charging station. EVSE Station just confuses people who don't know about that stuff, and I don't care for the term EVSE :-) But that's just me.
The CT2021 I purchased online

The Final converted OpenEVSE Charging Station!
The one I bought was actually still registered on the chargepoint network and I was able to transfer it into my name. The ChargePoint admin account was good for another 4 years! But after talking to the ChargePoint people I found that once expired in 4 years I would have to pay nearly $3,000 dollars to activate it for another full 5 years! That may be ok for a real commercial charger that supplies an income for someone, but I'm just using this thing at home for my cars and friends that visit. $3k can get me quite a few new chargers! No way I'm going to renew my charger for $3k every 5 years. I originally just planned to use it and run that 4 years out, see where I was in 4 years. Would I still have an EV? Would a cooler cheap charger be out by then? I got to thinking why wait! I know I'm not going to renew and I like projects. So I set out to find an EVSE (Electric Vehicle Supply Equipment) kit, or EV charger kit. I found a few companies selling neat kits to build your own EVSE, but one stood out to me, OpenEVSE, they had lots of options you can piece together, or just buy pre-made chargers with their guts.

Main OpenEVSE controller board
There really isn't a lot to EV chargers, the most difficult part is usually the wireless or web interface to get charger stats out of the unit. Dumb Chargers are pretty easy to build. The OpenEVSE board supports wifi, has a built in web server, nice LCD display with info and stats, as well as GFCI support, which was important to me, especially since we would be using this thing in the rain and snow! They price their parts pretty well, so I bought one of everything, almost. The ChargePoint CT2000 already has all of the 240 volt wiring, 40A contactors (relays), heavy duty J1772 plugs and cables, most of the wiring was even able to be reused! All I really have to do is remove the old ChargePoint Controller boards, display, and wireless radios and drop my OpenEVSE parts in! A little tweaking to the "head" case to fit my now two LCD displays and I would have my own heavy duty "ChargePoint" type commercial charger running OpenEVSE which I would have full control of, it would allow me to update and upgrade as technology changes, and no fees to get it on the network!
Lets get started
It was already installed and online with ChargePoint, But lets tear it apart!
 |
| Head Module Removed |
 |
Core 1 Removed
|
 |
| Core 1 and Core 2 removed, 240Vac Bus connectors |
Lets get this stuff on the workbench (aka dining room table) open up and get rid of the proprietary ChargePoint boards and make room for the new!
I'm starting with one the charging cable module, or as ChargePoint calls it, the L2 Core Module.
Core module
Lets open this puppy up!
Well the inside contains a ChargePoint controller board, a 40Amp contactor, a CT, and a GFCI CT, that's about it! I can put the entire OpenEVSE inside the Core module, then reuse the data connector on the top to get the LCD and WiFi serial signals out to the Head Module..... Sounds like a plan to me! Lets remove the stuff not needed for this conversion.
Removed the ChargePoint Controller PC board.
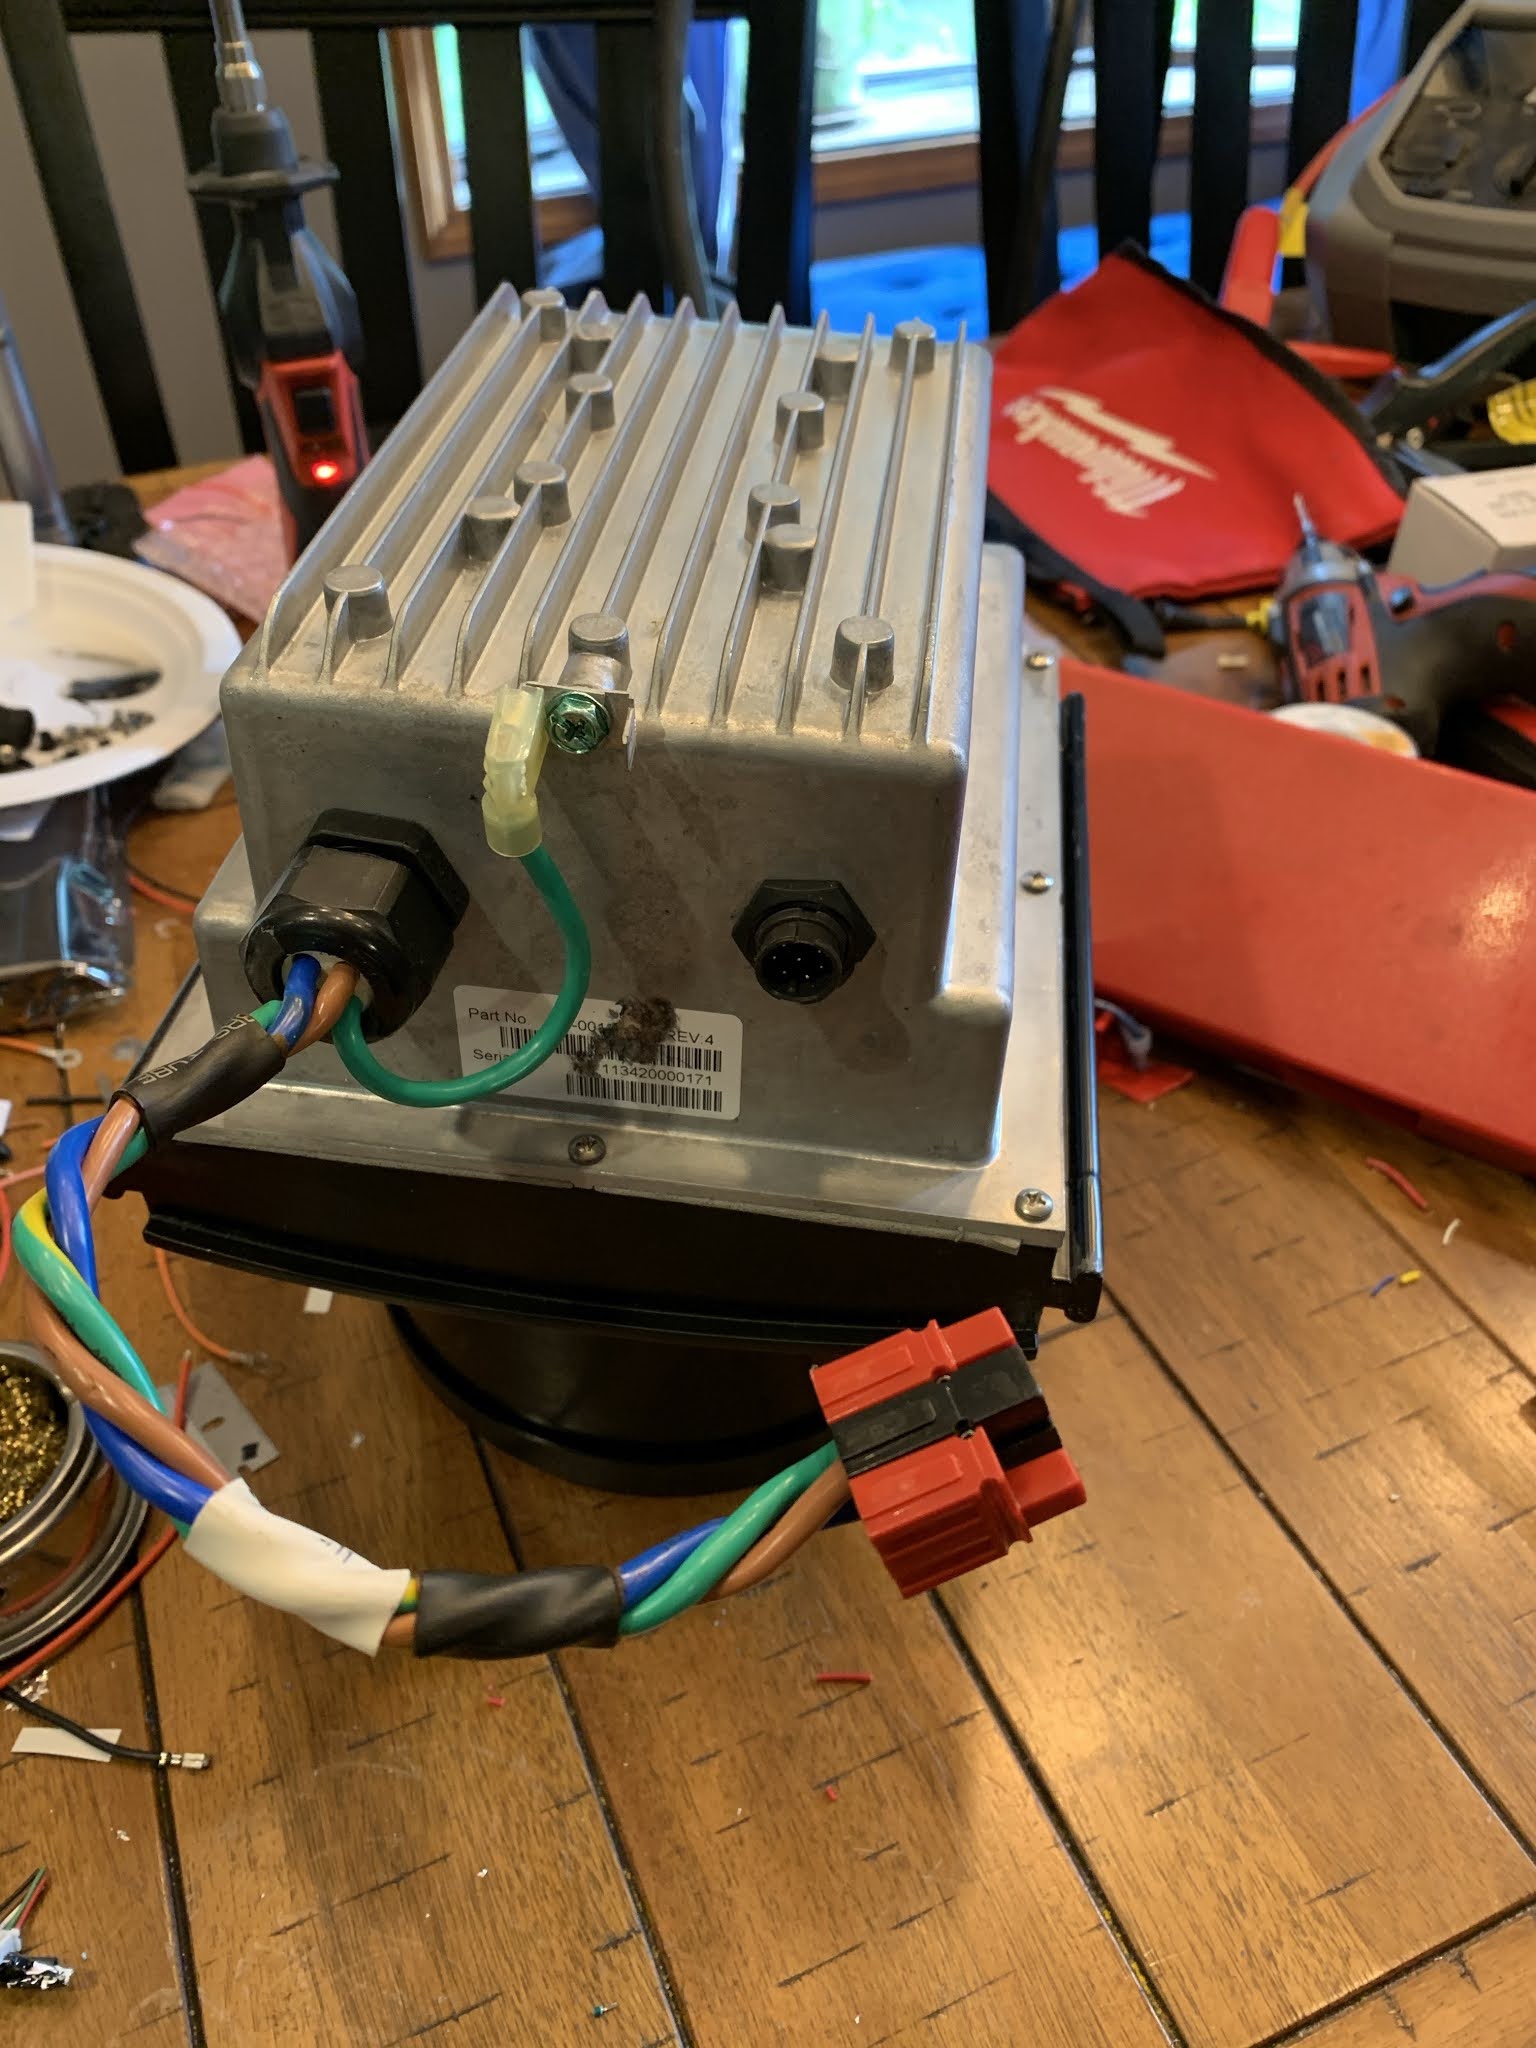
Removed the ChargePoint CT's, Striped back the data wires since I'm going to reuse those for the wifi and LCD display later. Cut and cleaned up the Contactor wires (red, white, blue, brown, black). These wires contain the contactor coil wires, the AC input and AC output monitor wires to monitor the state of the contactor.
Installed the OpenEVSE CT's
Note for other builders out there, DO NOT use spade, ring, fork, etc connectors for high current connections. In this image they are crimp connectors but they are ferrule connectors, so the full wire gauge makes contact with your connector vs some thin metal that is going to heat up. That yellow spade connector in the top left of the picture is only for the pilot wire, spades etc are ok for low current connections.
Reused the original ChargePoint PC board bracket for the OpenEVSE board. Had to drill four new holes, added some standoffs.
Standoffs and OpenEVSE controller Mounted
I purchased some new pins and put them right on the end of the ChargePoint wires already wired to the contactor. This conversion is going pretty easy!
The factory OpenEVSE connector prior to pulling the original pins and putting in my own.
Schematic for the 6 pin power connector.
New controller pretty much installed, CT's plugged in, Pilot wire hooked up, serial lines for the WiFi and LCD screen hooked up to the existing ChargePoint data cable.
Controller bracket with OpenEVSE board mounted.
Everything has plenty of room to breathe, and looks nice and clean.
One of the two Cores all back together, its basically a stand alone OpenEVSE with no LED or LCD display or WiFi, it will actually work just like this, the rest of the stuff is just bells and whistles. But I like bells and whistles so lets get started on those!
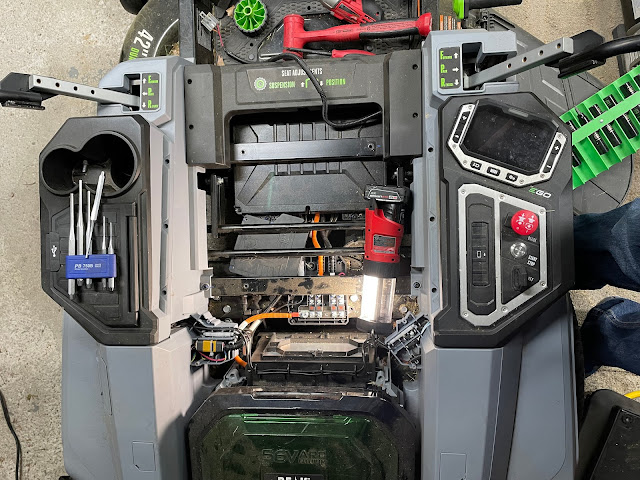
Convert The Head Module
The head started out looking something like this, I didnt take a good picture, so this one is made my Siemens, seems like a few companies have their name on these things, Leviton and ChargePoint, I'm actually not sure WHO really makes them any more.
Bye-Bye ChargePoint operating system!
 |
| Lots of stuff in the Head Module! Vacuum Florescent Display, controller board, Zigbee radio, Cellular Radio PCIe card, DC power supply. |
 |
| Shot of the Zigbee radio |
Needless to say I had to strip EVERYTHING out of the head, afterwards I cut a large hole the width of the OpenEVSE LCD screens. It was just way easier to cut one big hole rather than try to do two for the two LCD screens, this all gets covered up with a plastic sheet, and then a clear plastic cover anyway. So it will look pretty when I'm done.
Back side of the chopped up face plate for the Head Module.
 |
Two WiFi Boards at the very top, then two RGB LED boards, and the two RGB LCD displays. For this first go, I just used high temp hot glue, its actually strong stuff, doesn't just fall off like regular hot glue. There are no real stresses on the charging head, but on my version 2 I might just build a bracket to hold everything in the head and make it pretty.
|
 |
Front view showing how the LCD Displays fit
|
|
 |
| Shot of everything soldered up and ready to test! |
 |
| I had to add a +12vdc power supply to power the items in the Head Module |
  |
| A little trick of the trade, if you cut multiple wires at different lengths you can solder then heat shrink them in a single shrink tube and they cant make contact to short out. Saves space and shrink tube. I usually use the shrink tube with the glue on the inside as well, its a much better shrink tube. |
I used black PVC "Shim Stock" to hide the ugly hole I cut earlier, its much easier to work with and will cover everything up nicely. This will then be covered by the plastic face plate shown in the second image.
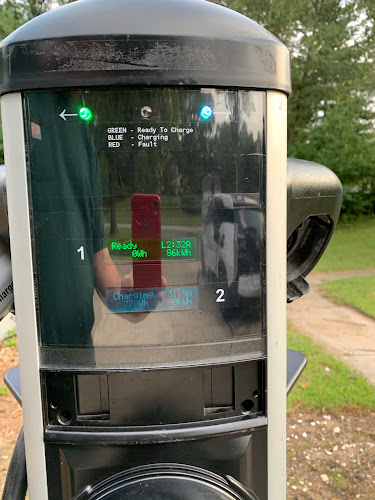 |
Wired up and Core #2 is charging my car!
|
I ended up changing out my LCD displays for OLED ones, the LCD’s were very hard to read in sunlight. These OLED displays have a wide viewing angle and look great in the sun and at night! In the above photo the top display is OLED and the bottom the standard LCD.
Looks nice, you wouldn't know it wasn't ChargePoint until you get up close
Holding up to our icy weather and cold winters!
* Special THANK YOU to the folks at
OpenEVSE for sending out my orders quickly, dealing with quite a few support tickets of me asking newbie questions, and them being so darn responsive. I know this is a small operation but customer service makes or breaks a company. Thanks and good job
OpenEVSE
Keywords: OpenEVSE build, open, evse, conversion, convert, how-to, retrofit, tear down, teardown, tear-down, inside, guts, chargepoint, charge, point, without account, cloud plan, private use, home use, personal use, CT2000, CT2021, CT2022, CT2025,


Comments
I found your Blog super inspiring... Im importing a 2015 Leaf from Japan, as they were never sold here, and I cant afford a better EV aka Tesla yet...
I picked up a second hand ct2001 series single unit... Initially, I want to just get it to charge in dumb mode, ie. no network etc... but i cant find any references to Instruction manuals on the web dealing with how to configure it. In Australia, Chargepoint have given up and ceased to exist and provide any services... see link
https://thedriven.io/2020/07/21/confusion-reigns-as-chargepoint-quietly-pulls-support-from-australian-ev-chargers/
So, until I can perhaps do a frankenstein on it akin to your efforts, I'd like to reset it or force dumb mode...
Any suggestions would be awesome... and if i can communicate directly via email, just holler
kind regards
Smoogus
In regards to the CT2001, I have one that is not connected to any network and it charges fine with any rfid card after a 15 second timeout, I use a spare Tesla keycard on mine. It utilizes the ChargePoiint “Prime Directive” to always charge if the network is down.
I love that this project brings back connectivity and data. I get data on mine since my house is monitored by the open source IOTAWatt energy monitor (a great device).
Also great that you utilized OpenEVSE. I had a unit for when I live in a home that had power in the driveway and the thing was awesome.